

Role-Based Access Control (RBAC) in Tableau allows you to control access to data and functionality based on the roles assigned to users. Role-Based Access Control also known as Permissions. Permissions determine how users can interact with content such as workbooks and data sources. This helps in ensuring that users have the appropriate level of access and permissions according to their Licenses or site roles within the organization.
Adding a user to Tableau Server/Cloud requires an available license. For each Server the user belongs to they have exactly one site role, restricted by their license. A user has permissions for content on the site, restricted by what their site role allows.
Licenses and Site roles apply to users. Permission capabilities apply to content.
Licenses are assigned to a user when they are on the Tableau Server or Tableau Cloud site. Users are licensed as a Creator, Explorer, or Viewer.
Site Administrator Creator and Creator:
Users allow full connecting and publishing access. This includes connecting to data and publishing new flows, new workbooks and new data sources from Tableau Desktop and the web editing environment. The site roles also allow editing and saving existing published workbooks, or publishing updates to existing data sources.
Explorer (Can Publish): User have limited publishing capabilities, as described in general capabilities allowed with each site role.
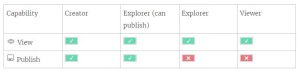
Explorer: Users have the access to download the data, Web edit but cannot have the access to publish the workbook.
Viewer: Users have the access to view the workbooks but do not have the access to download the data and web edit of the workbook.
Here’s a general guide on implementing RBAC in Tableau:
- Understand Site Roles:
- Identify the different Site roles within the organization that require access to Tableau.
- Examples of roles might include Site Administrators, analysts, viewers, etc.
- Create Tableau Server Groups:
- Map each role to a Tableau Server group.
- Log in to Tableau Server as an administrator and navigate to the “Server” pane.
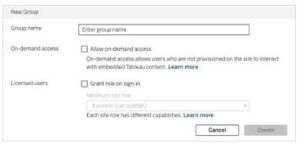
- Create groups that correspond to the roles you identified. On a Server click Groups, and then click New Group.
- Assign Users to Groups:
- Add users to the appropriate Tableau Server groups.
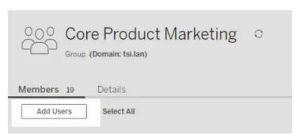
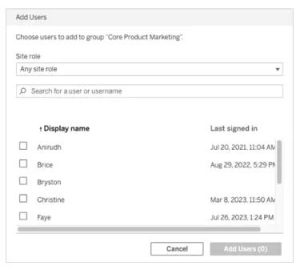
- From the left navigation pane, click on Groups, and then click the name of the group. This can be done manually through the Tableau Server interface or automated through Active Directory or other user management systems.Select the users to be added, and then click on Add Users. On the Group’s page, click on Add Users.
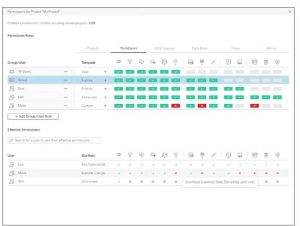
- Define Permissions:
- Define permissions at the project, workbook, or view level for each group.
- Specify who can view, edit, or own content within Tableau. To set permissions at the project/Workbook level:
- Navigate to the project.
- Open the Actions menu (…) and click Permissions.

- Assign Project Permissions:
- In Tableau Server, you can assign permissions at the project level.
- Navigate to the project, click on the ellipsis (three dots), and select “Permissions.”
- Assign permissions based on Site roles or groups.
- Workbook and Sheet Permissions:
- Drill down to the workbook and sheet level to fine-tune permissions.
- You can set permissions for each sheet within a workbook.
- Data Source Permissions:
- Set permissions on data sources to control who can access and modify them.
- This is crucial for ensuring that sensitive data is only accessible to authorized users.
Reference: Tableau Community
https://help.tableau.com/current/server/en-us/permissions.htm


